The WordPress migration plugin Duplicator poses an easy way to migrate a website to another server. This is often used for transferring the online presence to localhost for faster development. For that purpose, Docker compose is an easy way to spin up a development MySQL Server with an already installed WordPress instance with just one command. This method saves a lot of headache and time in configuring & installing MySQL, Apache/Nginx WebServer, and WordPress.
A famous docker compose file is the one to be found on the documentation page of docker.com. The script in the following or here:
version: "3.9"

services:
  db:
    image: mysql:5.7
    volumes:
      - db_data:/var/lib/mysql
    restart: always
    environment:
      MYSQL_ROOT_PASSWORD: somewordpress
      MYSQL_DATABASE: wordpress
      MYSQL_USER: wordpress
      MYSQL_PASSWORD: wordpress

  wordpress:
    depends_on:
      - db
    image: wordpress:latest
    volumes:
      - wordpress_data:/var/www/html
    ports:
      - "8000:80"
    restart: always
    environment:
      WORDPRESS_DB_HOST: db
      WORDPRESS_DB_USER: wordpress
      WORDPRESS_DB_PASSWORD: wordpress
      WORDPRESS_DB_NAME: wordpress
volumes:
  db_data: {}
  wordpress_data: {}
This article does not aim to be another step-by-step instruction on how to use the plugin, but rather address difficulties with the database connection within Docker. If you are not familiar with the process on how to use the WordPress Plugin Duplicator, please check the following tutorials:
Duplicator – WordPress Migration Plugin – WordPress-Plugin | WordPress.org Deutsch
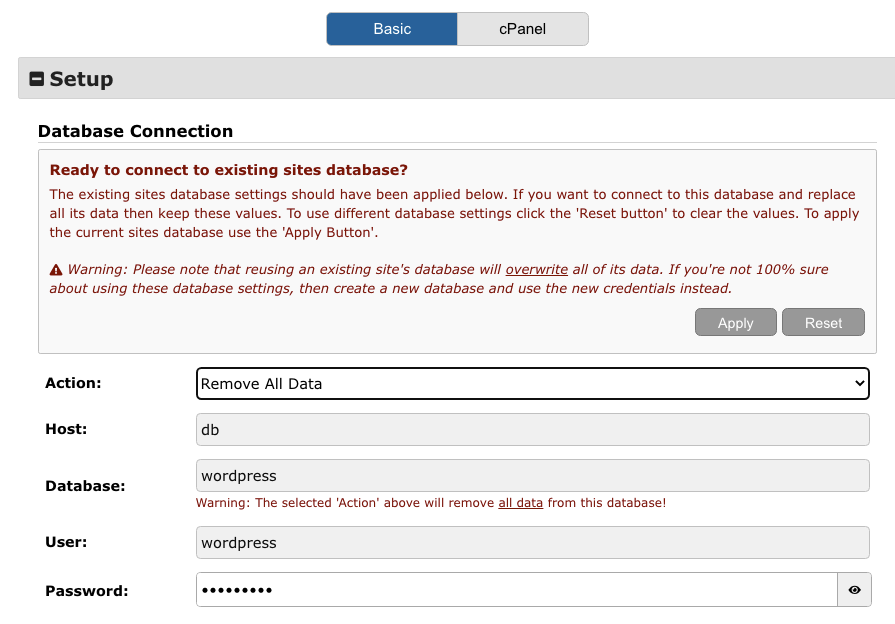
In step 2 of the installation wizard, you are supposed to enter the connection details of your MySQL server. In most of the tutorials, the host field shows localhost or 127.0.01. You might think now, since docker runs on my localhost, this should be fine. In reality this is a common pitfall with Docker, because it sets up its own network. Therefore, you need to use the container name specified below services, which is db. With the above underlying docker-compose file, your config should look like the following:

After testing the database connection, you should see this screen to continue with the installation wizard.

I hope I was able to help you. If you need further assistance, feel free to contact me on my Mail: mail@julius-reinhardt.de. In case you are interested in other articles, you can check Wifi Passwörter stehlen mit 1€ Bad USB Stick – Tutorial Tech or How to decrypt Nodejs TLS traffic with Wireshark – Tutorial Tech.


